Currently Empty: ₹0.00
This Quick Learner focuses on Exchange Online Protection (EOP), the cloud-based filtering service that serves as the backbone of email security in Microsoft 365. It covers the deployment and configuration of anti-malware, anti-spam, and transport rules to protect against phishing and malicious software.
1. What is EOP?
EOP is a cloud-powered email filtering solution that protects organizations against spam, malware, and other email threats.It acts as the first line of defense and covers the Prevention and Detection aspects of the security stack.
Licensing: It is included with any Exchange Online license. Unlike “Defender for Office 365” (which requires an extra license for advanced features), EOP provides the essential security layer.
How EOP Works? The Order of Operations
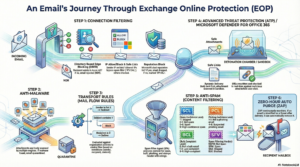
Understanding the order of operations is critical for troubleshooting. EOP processes inbound email in this specific sequence:
- Connection Filtering: Checks sender reputation at the edge. If the sender is bad, the email is rejected immediately.
- Anti-Malware: Scans for malicious code. If found, the message is quarantined.
- Mail Flow Rules (Transport Rules): Applies policy filtering (e.g., disclaimers, block lists).
- Advanced Threat Protection: Validates with Safe Attachment and Safe Link
- Anti-SPAM Content Filtering: Checks for spam, phishing, bulk email, and spoofing.
- Zero-Hour Auto Purge ZAP: Post deliver protection on Malware scanning.
- Delivery: If the email passes all checks, it is delivered to the recipient’s mailbox.
When an email enters Exchange Online, it passes through filters in this specific order. Understanding this sequence is vital for troubleshooting why an email was blocked or allowed.
Step 1: Connection Filtering (Edge Blocking, IP Reputation)
When MX record pointed to Exchange Online Protection, External Senders Email gateway routes the emails to EOP for your organisation by performing a MX lookup, Connection filtering the first component that scans the emails. Connect Filtering Checks IP Allow/Block lists, Safe Lists, and Directory Based Edge Blocking (DBEB).
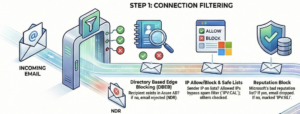
Directory Based Edge Blocking validates whether the email sent to a validate recipient in Exchange Online. If the email sent to email address where no recipient available in that Exchange Online organisation, then those emails will be dropped with Non Delivery Report.
IP Allow / Block List feature validate whether the mail originated from an Allowed or Blocked IP addresses. If IP in allowed list, SPAM filtering service will be skipped for those emails.
IP Reputation Block feature validates the emails with their Reputation Block list, Microsoft has their own list and also, it subscribed 3rd part list as well and take an action on the email.
To validate whether the connection filter applied on a email, we need to check the below mentioned Message Header and its values.
Message Header: X-Forefront-Antispam-Report
Important Values:
IPV:CAL: Source IP is in the Allow List (Spam filtering skipped).
IPV:NLI: IP is Not Listed in Microsoft’s reputation list (Neutral).
550 5.1.10 RecipientNotFound: Rejected by DBEB because the recipient is not in Azure AD.
Step 2: Anti-Malware (Virus, Spyware, Ransomware)
Once the email passes the connection filtering service, Anti-Malware engine will scan the email for Virus and Malware. Microsoft uses multiple Engines to perform a Virus, Malware, Spyware on the attachment as well as on the body of the email.
If any malware identified, email will be quarantined.
To validate whether the connection filter applied on a email, we need to check the below values.
- Look for S:AMA in the “Custom Data” section to confirm processing.
- Action: Messages found with malware are quarantined and usually admin-only accessible.
Step 3: Transport Rules (Mail Flow Rules)
If the email is clean without any Virus or Malware and passes the Anti-Malware scans, Transport Rules configured on the EOP will be applied on the emails
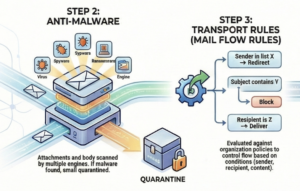
Custom organization rules (e.g., disclaimers, blocks, quarantine, Forward, Use a connector etc). will be applied based on the Transport Rule configurations. Transport Rule has a Priority values and the rules will be processed based on the Priority value.
To validate what action has been taken on the email on the transport rule, check the below value on the custom data header value.
Look for S:TRA in “Custom Data”.
Step 4: Advanced Threat Protection (Safe Attachments & Safe Links)
If the email passing the Transport Rules, Advanced Threat Protection feature will validate the email with Safe Attachment and Safe Link option. Advance Threat Protection features requires separate license and it is included in E5 and F5 licenses.
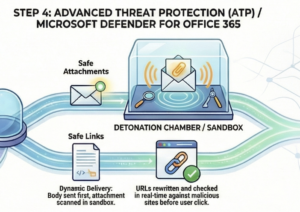
Safe Attachments (Sandboxing) validates the attachment in the email and check the behaviour of the attachment by opening the attachment in Sandbox environment and check the behaviour whether it is making any registry change etc.
Safe Links (URL rewriting) rewrites the urls in the email and when user clicks on the link, it will be validated to see whether link is malicious or not.
Header values to check
X-MS-Exchange-Organization-SafeAttachmentProcessingX-MS-Exchange-Organization-SafeLinksProcessing
Safe Attachment has a feature named Dynamic Delivery that allows the email body to be delivered while the attachment is scanned (up to 30 mins).
Step 5: Anti-Spam (Content Filtering, Phishing, Bulk)
Once the ATP features applied on the email if a validate Defender for Office 365 P1 or P2 license available on the Tenant, Anti-Spam features will be applied checks for whether the content is a SPAM (SPAM Confidence Level SCL ), Phishing (Phishing Confidence Level PCL or Bulk Email (BCL).
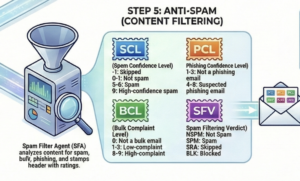
Spam Confidence Level (SCL) Values:
- -1: Internal email or Bypassed (Safe Lister/Transport Rule).
- 0-1: Not Spam (Clean).
- 5-6: Spam.
- 9: High Confidence Spam.
We can check the Message Header to see whether the Anti-Spam policy identifies the emails as SPAM or Bulk emails using the value S:SFA in “Custom Data”.
Below codes will be available on the custom data and the explanations are below
Spam Filtering Verdict (SFV) Codes:
-
- NSPM: Not Spam.
- SPM: Marked as Spam.
- BLK: Blocked by sender list.
- SKA / SFE: Skipped/Allowed (Whitelist or Safe Sender).
Step 6: Zero-hour Auto Purge (ZAP) (Post-delivery protection)
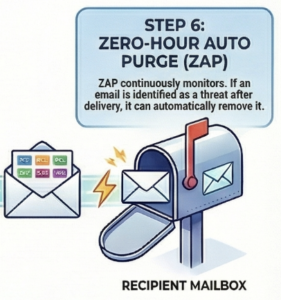
ZAP automatically detects and removes malicious messages (spam, phishing, malware) after delivery, moving them to quarantine.
Zero-Hour Auto Purge Removes malicious emails after they have already been delivered to the inbox.
Header: X-Microsoft-Antispam-ZAP-Message-Info.
To troubleshoot the mail flow issues, use the message header analyzer and check the values explained above to find the cause of the email failures.
Key Acronyms
- BCL: Bulk Complaint Level (1-3 is moderate; 8-9 is high complaint bulk mail).
- PCL: Phishing Confidence Level (4-8 indicates phishing).
- DBEB: Directory Based Edge Blocking (Rejects invalid recipients at the gateway).
- MTA / MSA: Message Transfer Agent / Message Submission Agent (Server services that pick up email).
Key Configuration Tasks
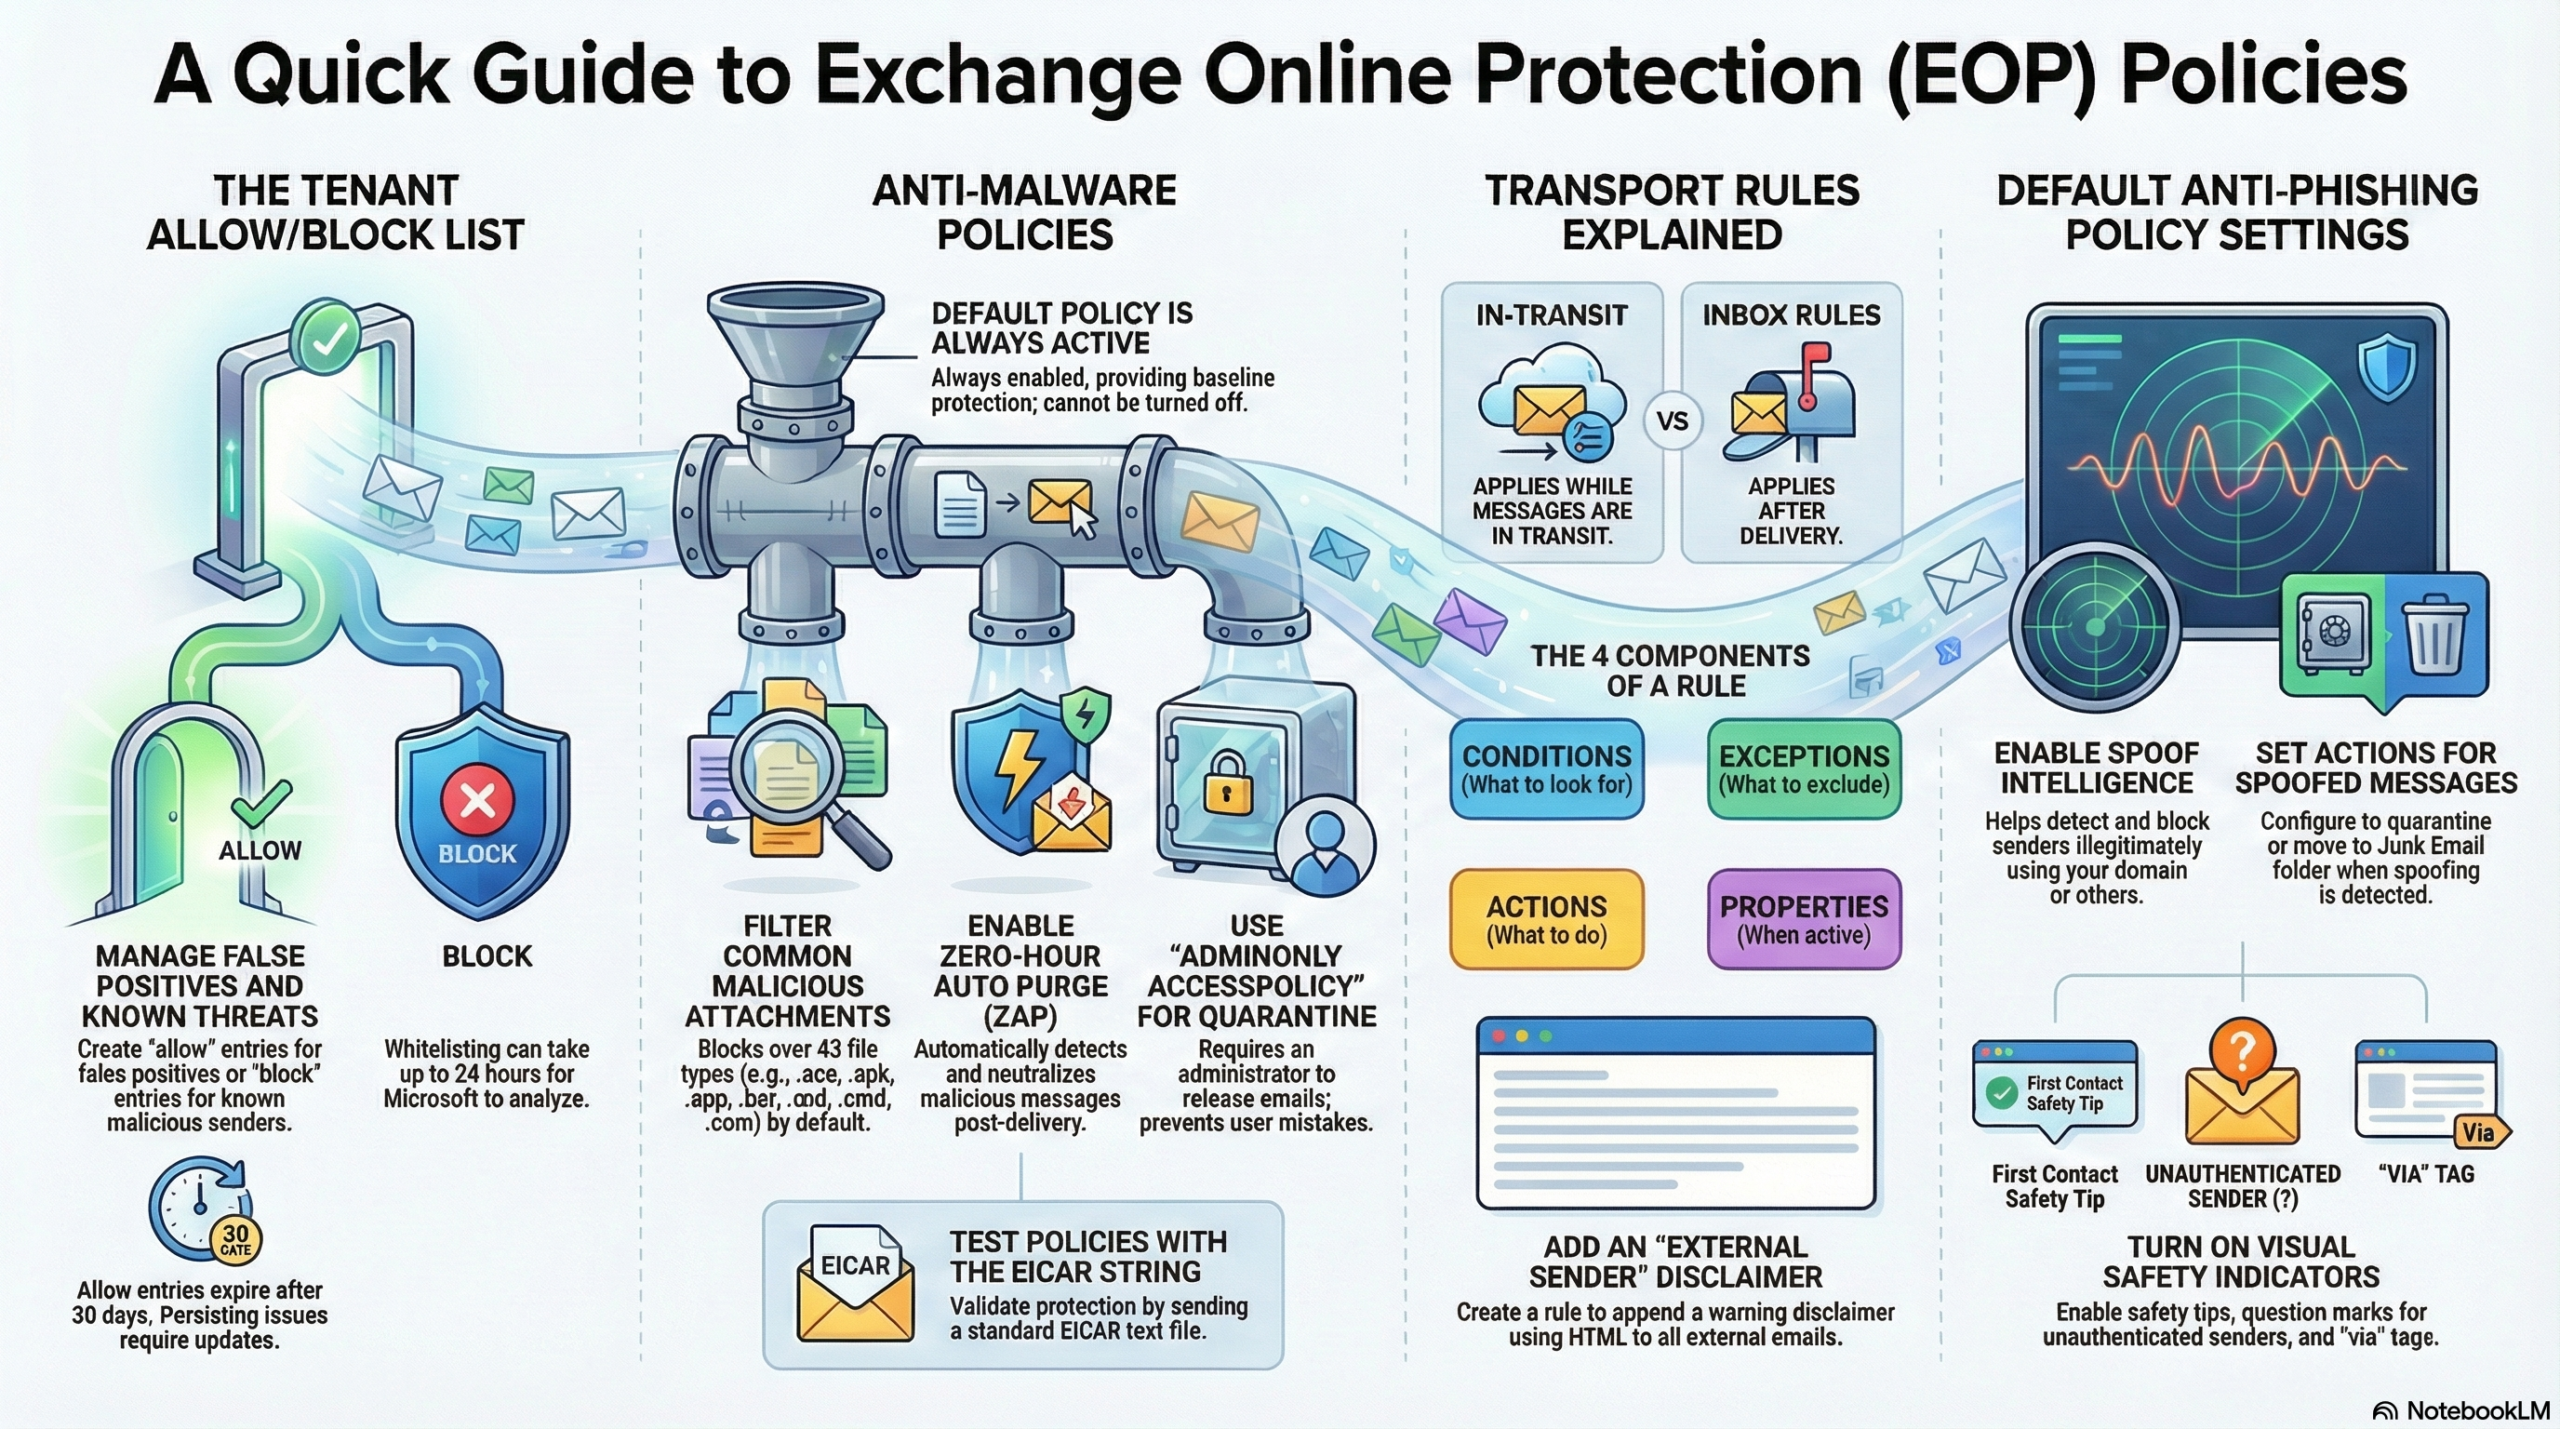
A. Managing the Tenant Allow/Block List
Use this when EOP produces false positives (blocking good email) or false negatives (letting bad email through).
- Where: Microsoft 365 Defender Portal -> Submissions.
- Action: Submit an email, URL, or file to Microsoft for analysis.
- Configuration: You can choose to block emails based on the sender or the entire domain.
- Duration: Block entries last for 30 days by default, but can be configured to expire in 1 day, 90 days, or never.
B. Configuring Anti-Malware Policies
EOP has a default policy that is always on, but you can create custom policies for specific groups (e.g., High-Value Targets).
- Where: Microsoft 365 Defender -> Email & Collaboration -> Policies & Rules -> Threat Policies -> Anti-Malware.
- Critical Settings to Enable:
- Common Attachments Filter: Blocks specific file types (e.g., .exe, .bat).
- Zero-hour Auto Purge (ZAP): Retroactively removes malware from inboxes if discovered after delivery.
- Quarantine Policy: Recommended setting is AdminOnlyAccessPolicy, ensuring only admins can release malware messages.
- Testing: You can test your policy using the EICAR test string saved in a text file.
C. Managing Transport Rules (Mail Flow Rules)
These rules act like inbox rules but apply while the message is in transit. They are not strictly a security boundary but improve visibility.
- Components: Rules consist of Conditions (if), Exceptions (unless), and Actions (do this).
- Common Use Case: Adding a “Disclaimer” or HTML banner to emails originating from external senders to warn users.
- Where: Exchange Admin Center -> Mail flow -> Rules.
D. Content Filtering (Anti-Spam & Anti-Phishing)
- Anti-Spam: Custom policies override default ones. Key settings include configuring the retention period for quarantined spam and enabling safety tips.
- Anti-Phishing: The default EOP policy focuses on spoof intelligence.
- Actions: If a message is detected as spoofed, the default action is to move it to the Junk Email folder or Quarantine.
- Indicators: Enables safety tips (e.g., “First contact” tip) and “via” tags for unauthenticated senders.
Best Practices & Tips
- Prerequisites: You need Global Administrator or Security Administrator roles to configure these settings.
- Quarantine Logic: For high-risk items (malware), do not allow users to release items themselves; use AdminOnlyAccessPolicy.
- HTML Knowledge: When creating transport rules for disclaimers (e.g., bold text), basic HTML tags like
<b>are required. - Submission Speed: Allow entries for false positives (allowing legitimate mail) can take up to 24 hours to propagate after Microsoft analyzes the submission.